

How To Upload Excel File To Database In Entity Framework Using C#
In this section, we are going to encompass Migrations and Seed data features in Entity Framework Core.
In the previous parts of this serial, we accept created the database model (entity and context classes) and practical unlike configuration options. Now it is time to transfer this database model to the real database in the SQL server. Our SQL database schema needs to be aligned with our awarding's database model and using migrations will help the states proceed things that way.
EF Core provides a method called Migrate to execute migration actions for us. All nosotros have to do is to create model classes, a context class, apply configuration (which we already did) and create and execute migrations with the ready of elementary commands.
VIDEO: Migrations and Seed Data with Entity Framework Core.
Y'all tin download the source code for this article on our GitHub repository.
To see all the basic instructions and complete navigation for this series, visit Entity Framework Core with ASP.Net Cadre Tutorial.
Creating and Applying Migrations in EF Core
Using migrations is a standard way to create and update a database with Entity Framework Core. The migration process has two steps: Creating migration and Applying migration. Equally we already said, our database schema must be aligned with the database model and every change in a database model needs to exist migrated to the database itself.
Those changes might for example exist:
- Changes in the properties of the model class
- Configuration changes
- Adding or removing the
DbSet<T>properties from the context class
From ASP.Cyberspace Core iii.0, EF Cadre tools required for migrations are non preinstalled. Therefore, nosotros have to install Microsoft.EntityFrameworkCore.Tools library. If you are following this series from the offset, then y'all already accept the Microsoft.EntityFrameworkCore library installed.
To create a migration, we tin use the Visual Studio'southward Bundle Director Console window or the command window (Windows command prompt). For the PMC window, the command is:
Add-Migration MigrationName [options]
Or through the dotnet CLI:
dotnet ef migrations add MigrationName [options]
In our application, we are going to apply the PMC, then allow's exercise that by typing:
PM> Add-Migration InitialMigration
After we press the Enter key, our migration will be completed.
Actions that Have Place Behind the Scene
Afterward we execute the Add-Migration command EF Cadre does several things behind the scenes to prepare our migration. The outset thing it does is inspecting our class, associated entity classes (in this case only the Pupil form) and any configuration nosotros practical. After that, information technology creates iii unlike files in the Migrations folder:
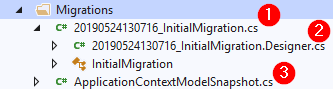
The ApplicationContextModelSnapshot.cs file holds the model of the database and it is updated every time a new migration is added. The other two files: InitialMigration and InitialMigration.Designer are files that contain and describe the newly created migration.
So, if you lot accept followed all the steps from the previous articles, the content of the InitialMigration file should wait like this:
public fractional class InitialMigration : Migration { protected override void Up(MigrationBuilder migrationBuilder) { migrationBuilder.CreateTable( proper noun: "Student", columns: table => new { StudentId = tabular array.Column<Guid>(nullable: imitation), Name = tabular array.Column<string>(maxLength: 50, nullable: faux), Age = table.Column<int>(nullable: truthful), IsRegularStudent = table.Column<bool>(nullable: false, defaultValue: truthful) }, constraints: table => { table.PrimaryKey("PK_Student", x => x.StudentId); }); } protected override void Down(MigrationBuilder migrationBuilder) { migrationBuilder.DropTable( name: "Pupil"); } } This file has 2 methods conveniently named Up and Down. The Up method consists of commands that will be executed when nosotros apply this migration. Equally an contrary activeness, the Downwardly method volition execute commands when we remove this migration (in this case information technology volition just drib this created table).
Applying Created Migration
Afterwards we accept successfully created our migration, nosotros have to employ information technology for changes to take consequence in the database. There are several ways of applying migrations (Using SQL scripts, using Database.Drift method or using command line methods), and as we did with the creation, nosotros are going to utilise the command line methods arroyo.
For the Parcel Manager Console the command is :
Update-Database [options]
For the command prompt window the command is:
dotnet ef database update [options]
Since we already decided on PMC, let's open the PMC window and execute the command:
PM> Update-Database
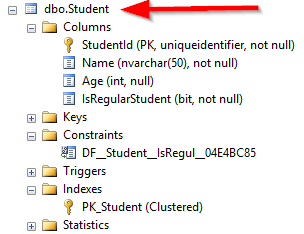
Afterwards nosotros press the Enter primal, nosotros are going to meet all the different actions EF Core does for us to apply created migration. As a event, nosotros are going to take our Student tabular array created with all the provided configuration from the previous articles:
There are few more important facts we take to know almost EF Core'southward migrations. If nosotros inspect our database, we are going to notice another created tabular array: _EFMigrationsHistory. EF Cadre uses this tabular array to track all the applied migrations. So, this ways that if nosotros create another migration in our code and utilise it, EF Core will apply simply the newly created migration.
Simply how does EF Core know what migration needs to be applied?
Well, it stores a unique Id in the _EFMigrationsHistory, which is a unique proper noun of the migration file created with the migration, and never executes files with the same proper name again:

Each migration is applied inside an SQL transaction, which means that whole migration either succeeds or fails. If nosotros have multiple migrations to use, so they will exist practical in the exact order they are created.
Adding a Custom Code in a Migration File
Nosotros have already explained the purpose of the Up and Downward methods in our InitialMigration file. But all the code in those methods is generated by EF Core. If needed, we can add our custom code, too. We can use the MigrationBuilder parameter to access the wide range of methods that tin help us in the procedure. I of those methods is the Sql method that we tin use to add the custom lawmaking we like.
So, allow's open the InitialMigration course and alter it past adding our custom code:
public partial class InitialMigration : Migration { protected override void Upwards(MigrationBuilder migrationBuilder) { migrationBuilder.CreateTable( name: "Student", columns: table => new { StudentId = tabular array.Column<Guid>(nullable: false), Name = table.Column<cord>(maxLength: l, nullable: simulated), Age = tabular array.Column<int>(nullable: true), IsRegularStudent = table.Column<bool>(nullable: fake, defaultValue: true) }, constraints: table => { tabular array.PrimaryKey("PK_Student", ten => x.StudentId); }); migrationBuilder.Sql(@"CREATE PROCEDURE MyCustomProcedure AS SELECT * FROM Student"); } protected override void Down(MigrationBuilder migrationBuilder) { migrationBuilder.DropTable( proper noun: "Student"); migrationBuilder.Sql(@"DROP PROCEDURE MyCustomProcedure"); } } Nosotros should brand sure to accept the Sql method in the Down method to execute the opposite actions if we decide to remove our migration.
Now, nosotros tin can delete our database (simply to simulate the initial state in the SQL server) and simply utilise our migration again (we don't need to create it, it is already created).
Creating Migration if Entities and Dbcontext Files are in a Divide Projection
Right now, our model and context classes are in the principal project together with the migration files. But in many real-life projects, models and context classes are in a separate projection (repository pattern might be one of the reasons for example). For such projects, executing migrations couldn't be possible with the setup as we have in our project.
Let'due south attempt to demonstrate what nosotros mean.
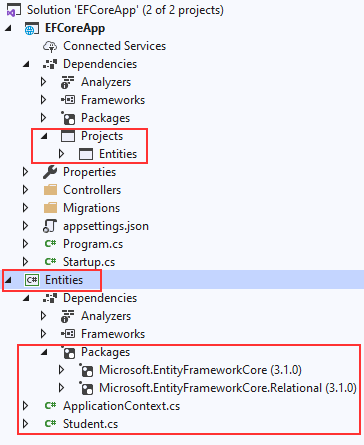
The first matter to do is to create some other .Net Cadre Grade Library project and name information technology Entities and install Microsoft.EntityFrameworkCore and Microsoft.EntityFrameworkCore.Relational packages via NuGet Bundle Manager or PMC window:
PM> Install-Packet Microsoft.EntityFrameworkCore -Version 3.1.0
PM>Install-Package Microsoft.EntityFrameworkCore.Relational -Version 3.1.0
Then we demand to add the reference to the Entities project in our main project.
Afterwards that, permit'south copy the ApplicationContext and the Student classes, paste them in the Entities project and remove the Entities binder from the principal project. Our structure should expect like this:
As presently equally we practise that, we need to change the namespace in the ApplicationContext and Pupil classes from EFCoreApp.Entities to merely Entities. Furthermore, we accept to do the same affair for the using directives in the Startup class and in all three migration files.
Having done all that, our projection should build successfully.
Calculation a New Migration
Now we can attempt to add another migration past typing:
PM> Add together-Migration TestMigrationFromSeparateProject
Simply, as presently every bit we striking the Enter fundamental, we are going to become an fault bulletin which explains that our EFCoreApp project doesn't match our migrations assembly Entities. This error message is swell because it provides u.s. with an caption of how to solve our trouble.
All we have to do is to change our migrations associates, then let's do exactly that in the Startup form:
public void ConfigureServices(IServiceCollection services) { services.AddDbContext<ApplicationContext>(opts => opts.UseSqlServer(Configuration.GetConnectionString("sqlConnection"), options => options.MigrationsAssembly("EFCoreApp"))); services.AddControllers(); } At present, we tin run the same command again, but this time it will execute successfully. We have successfully created our new migration along with the migration files in the Migrations binder:
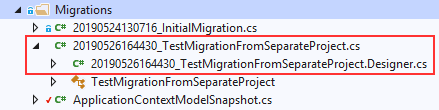
We tin run into that the TestMigration file has no code in the Up and Down methods, and this is normal considering we didn't change anything, but we completed our required task.
Removing a Migration
We've learned how to create migrations from a divide project. Only as a effect of that, nosotros have created an empty migration which does nothing in our database. When nosotros create a migration that we're not satisfied with, nosotros can hands remove information technology by typing the Remove-Migration [options]command in the PMC window. And then, permit'southward exercise that:
PM> Remove-Migration
After a few seconds our previous migration volition be removed:

Excellent, now we tin can move on.
Seed Data in Entity Framework Core
In nigh of our projects, we want to take some initial data in the created database. Then as soon as nosotros execute our migration files to create and configure the database, we want to populate it with some initial information. This action is chosen Data Seeding.
We can create the code for the seeding action in the OnModelCreating method past using the ModelBuilder, equally we did for the Fluent API configuration. So, let'south add together a few rows into the Student tabular array:
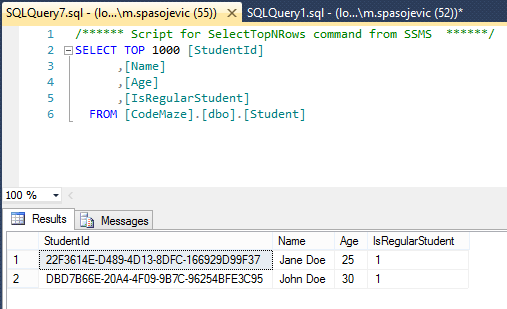
protected override void OnModelCreating(ModelBuilder modelBuilder) { modelBuilder.Entity<Educatee>() .ToTable("Pupil"); modelBuilder.Entity<Educatee>() .Property(south => s.Historic period) .IsRequired(imitation); modelBuilder.Entity<Pupil>() .Property(southward => s.IsRegularStudent) .HasDefaultValue(true); modelBuilder.Entity<Student>() .HasData( new Student { Id = Guid.NewGuid(), Name = "John Doe", Age = 30 }, new Student { Id = Guid.NewGuid(), Name = "Jane Doe", Age = 25 } ); } So, we are using the HasData method to inform EF Cadre about the data it has to seed. The rest of the code is self-explanatory because we are simply adding the required data. We are not using the IsRegularStudent property because we created a configuration for that property to accept a default value.
Now nosotros can create a new migration:
PM> Add-Migration SeedInitialData
And utilise it:
PM> Update-Database
We can check out our table to inspect the result:
A Meliorate Way for Applying Configuration and Information Seed
Nosotros tin can place all of the configuration code within the OnModelCreating method, and that will work as it supposed to. Every bit we can come across, our OnModelCreating method is readable and piece of cake to maintain. Merely, what if we had a larger project with more than classes and more data to seed? Our method would become difficult to read and maintain.
EF Cadre provides a better way for creating a Fluent API configuration by using the IEntityTypeConfiguration<T> interface. By using it, we tin split the configuration for each entity into its own separate configuration class.
So, let's run across how to do that.
In the Entities project, we are going to create a new folder Configuration and inside a new form StudentConfiguration:
public class StudentConfiguration : IEntityTypeConfiguration<Student> { public void Configure(EntityTypeBuilder<Educatee> architect) { throw new NotImplementedException(); } } Of course, we don't want to throw an exception (it is a default code subsequently VS implements an interface), so, let'south modify this method:
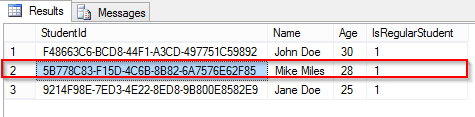
public void Configure(EntityTypeBuilder<Educatee> builder) { architect.ToTable("Pupil"); builder.Property(s => s.Historic period) .IsRequired(simulated); builder.Property(s => due south.IsRegularStudent) .HasDefaultValue(true); builder.HasData ( new Student { Id = Guid.NewGuid(), Proper noun = "John Doe", Historic period = 30 }, new Pupil { Id = Guid.NewGuid(), Proper name = "Jane Doe", Age = 25 }, new Student { Id = Guid.NewGuid(), Name = "Mike Miles", Age = 28 } ); } This code is a piffling bit different from the one-time OnModelCreating code considering nosotros don't take to apply .Entity<Student> part anymore. That's because our builder object is already of type EntityTypeBuilder<Student>. We have added an boosted object to insert, just to have something to create a migration for.
All we take to practise is to alter the OnModelCreating method:
protected override void OnModelCreating(ModelBuilder modelBuilder) { modelBuilder.ApplyConfiguration(new StudentConfiguration()); } And that is all.
Nosotros can at present add a new migration and apply it:
PM> Add-Migration AdditionalRowInserted
PM> Update-Database
Setup the Initial Migration as Soon as Applications Starts
For every created migration, we had to utilize its changes manually. And this is quite okay. But when we deploy our application, it would be nice to take initial data at that moment in the database.
What would be even nicer is that we don't have to do that manually, merely to start all the required migrations and seed all the required data as soon equally the application starts.
Of course, as well beingness useful on deployment, it helps when sharing or developing our application with other people. Nosotros would similar them to get-go the app and execute all the migrations earlier the app configures.
Well, we are going to prove you how to do exactly that.
Creating an Extension Method
Let's create a new class MigrationManager in the Entities project. Information technology is going to be a static grade considering we are going to create an extension method to outset all the migrations at the application'south startup:
public static class MigrationManager { } At present, we take to install Microsoft.ASPNetCore.Hosting.Abstractions library (nosotros need this for the IHost blazon nosotros are going to use in our extension method) and add the MigrateDatabase extension method to this class:
public static class MigrationManager { public static IHost MigrateDatabase(this IHost host) { using (var scope = host.Services.CreateScope()) { using (var appContext = scope.ServiceProvider.GetRequiredService<ApplicationContext>()) { endeavour { appContext.Database.Migrate(); } catch (Exception ex) { //Log errors or do anything you think information technology'southward needed throw; } } } return host; } } We are using the IHost type considering this allows us to chain this method in the Program.cs file and of grade, as yous can see, nosotros need information technology for the main logic.
And so, we are creating a service scope and using it with the ServiceProvider to obtain an instance of the ApplicationContext class. In the showtime article, we accept discussed properties contained in the DbContext class, and now, we are using ane of them (Database) to call the Migrate method for the migration execution.
Applying the MigrateDatabase method
The next step is to call this method in the Program.cs class:
public static void Main(string[] args) { CreateWebHostBuilder(args) .Build() .MigrateDatabase() .Run(); } Finally allow's remove the Student and _EFMigrationsHistory tables from the database and remove the stored process in the Programmability folder, to simulate an empty database (or just drop your database :D). So, we can start our awarding. Nosotros are going to come across logs in a console window which tells united states that migrations are executing. After the migrations take finished their work, we can check the database to confirm that all the tables and process have been created again.
Reverting and Scripting Migrations
In one of the previous sections, we have learned how to remove migration if we oasis't practical it. But in the instance nosotros have, we can't remove it just similar that, we need to revert it to the specific migration.
So, to show how migration reverting works, we are going to add another row in the StudentConfiguration class, create, utilise migration and and so revert it dorsum to the previous values.
Let'due south first add another row to seed:
new Pupil { Id = Guid.NewGuid(), Name = "TEST Name", Age = 100 } Then let's create:
PM> Add-Migration RevertTestMigration
and utilize migration:
PM> Update-Database
We can run across in the database that a new row has been added. But as we are non satisfied with this migration (hypothetically), let's revert it:
PM> Update-Database AdditionalRowInserted
The AdditionalRowInserted migration was the previous 1, and if nosotros check our database now, nosotros are going to run into that information technology was reverted to the specific migration values.
Finally, if we want to make a SQL script of all our migrations, we can do that by typing:
PM> Script-Migration
This command will create a script file for us.
Conclusion
Excellent, we take learned a lot of different data most data migration and how to use it in various situations within EF Core.
So, to summarize, we have covered:
- How to create and apply migrations
- The manner to add together custom lawmaking in our migrations
- Using model and context classes from a different project for our migrations
- How to seed information and to prepare initial seed as before long every bit the project starts
- The style to remove, revert migrations and to create script files
In the side by side article, we are going to larn more about the configuration of relationships in EF cadre.

Source: https://code-maze.com/migrations-and-seed-data-efcore/
Posted by: jacobsslions.blogspot.com
0 Response to "How To Upload Excel File To Database In Entity Framework Using C#"
Post a Comment